Tech Philter

Backup Your TikTok Videos (Before You Can't)

Black background with white text of the TikTok logo.

We don't truly know whether TikTok will still work after January 19th, 2025, so now is as good as any time to download and backup the TikTok videos on your profile. Besides, it is just good practice to keep personal backups on your own storage devices and not rely solely on cloud services. We never know how long these cloud platforms will stick around.

The process described below is based off of Khan XO's Youtube Tutorial which helped me backup all of my account's videos with no watermark in about 20 minutes. This article will contain a few different details and suggestions when downloading videos.

Requirements:

  • A computer (Windows/Mac/Linux)
  • A Web Browser (Chrome/Firefox)
  • HDD (Hard Disk Drive) or SSD (Sold State Drive) space to store videos
  • An internet connection

READ THIS BEFORE PROCEEDING

Disclaimer: This article is for informational and educational purposes only intended to help users back up their data. This article does not promote or endorse illegal activity, copyright infringement, or the violation of any laws. The methods and tools discussed are provided as general knowledge and are not guaranteed to be safe, secure, or free from malicious content. The author makes no claims regarding the legality, ethical use, or outcomes of applying the information described._

By choosing to implement any methods or execute any third-party code referenced in this article, you (the reader) assume full responsibility for any risks, including but not limited to harm to your device, data loss, legal consequences, or other liabilities. The author disclaims all liability for damages, losses, or penalties resulting from the use or misuse of the information provided.

Proceed at your own risk.

Caveats and Tips (Please Read)

Make Sure You Have Enough Hard Drive Space

The amount of space needed to download and save your videos will depend on the number of videos you are downloading and the length of each video. This can vary anywhere between a few gigabytes (GB) for about 300 videos to 20GB+ for 1500 videos or more. Using a general estimate, if you are planning to download below 500 videos, then 5GB or so should be enough.

Start Small and Scale Up

If this is your first time going through this process, it is highly recommended that you create a small Collection of videos on your account (such as 5 or 10) before moving on to larger lists of videos.

Be mindful of Bandwidth Limitations

This tool is capable of downloading several hundreds of gigabytes of data over a short amount of time if not used responsibly and can easily push you past Internet Service Provider (ISP) bandwidth caps. Be mindful and double check how many videos you intend to backup from the process described.

Use This Method To Back Up Your Own Content

The tools described here are intended for readers to download videos they have posted to TikTok for backup purposes only.

What Videos You Cannot Backup

The method described below will not work for videos that:

  • had their sound removed because of copyright claims.
  • were banned/removed due to Tiktok Community Guideline violations.
  • are set to private. This includes drafts. All videos need to be publicly available for this method to work.

Please see the Frequently Asked Questions section near the bottom of this article for additional information on what can/cannot work using this method.

How to Download & Backup your TikToks

I recommend you view and follow Khan XO's Youtube Tutorial for setting the folders for your and configuring folders for your Windows system. Below is a TLDR step-by-step:

  1. Install yt-dlp.

  2. Install ffmpeg and configure your system PATH variable if needed.

  3. Go to Dinoosauro's github and copy the javascript code linked on the page. ADDITIONAL DISCLAIMER: I cannot vouch for the javascript code mentioned here. I did a general review of the code and also employed the assistance of a coding AI bot to check whether erroneous information is being harvested (personally identifiable information, user login credentials, etc.) or whether malicious code is executed (such as code injections, user account hijacking, or "man-in-the-middle" attacks). The script only appears to strip down the current TikTok page in the browser, automatically scroll to the bottom of the page to the final video, and save the URLs for each TikTok video the script finds on the page for the user to save as a text file after the script is executed. That being said, I am not a lawyer or a professional developer. Be cautious when executing third party scripts on your local device. ALWAYS examine the source code carefully yourself to ensure no malicious code is executed.

  4. Open an incognito window and go to your TikTok profile.

  5. Use CTRL+Shift+I (Windows) to open the Developer console on your browser (CMD+Option+I on Mac) and paste in the javascript you copied from Step 3 and press Enter. NOTE: The browser may warn you against pasting in third party code. If needed, type "allow pasting" in your browser's Developer console, press Enter, and then paste the code from Step 3 and press Enter.

  6. After the script runs, you will be prompted to save a .txt file on your computer. This file contains the TikTok URLs of all the public videos on your page. Save the text file to the directory where you want to save your videos.

  7. Open your computer's Command console (Windows) or Terminal (Mac/Linux) and navigate to the directory where you want to save your videos.

  8. Type (or copy/paste) the following command into your cmd console:

    yt-dlp --write-description -a FILE -o '%(uploader)s_%(upload_date)s_%(id)s.%(ext)s'

Replace FILE with the full name of the text file you saved in Step 6.

The command in Step 8 will download two files: 1) a ".description" file, which is just a text file that contains the description you used in your TikTok video and 2) the TikTok video. This is very handy, for example, if you wrote out a full recipe or a tutorial in the video description and want to save that information.

If you don't care about saving the text descriptions of your TikTok videos, just remove the --write-description from the command above. The command would then read:

yt-dlp -a FILE -o '%(uploader)s_%(upload_date)s_%(id)s.%(ext)s'

You successfully made a backup of your TikTok videos!

Bonus Command (Time Delay)

Alternatively, you can use the following command that will add a small delay in between each TikTok video download for your profile. This is useful if you are on a metered bandwidth connection and need to spread out the download time. The command below will add a delay anywhere between 5 and 12 seconds:

yt-dlp --min-sleep-interval 5 --max-sleep-interval 12 --write-description -a FILE -o '%(uploader)s_%(upload_date)s_%(id)s.%(ext)s'

If you want a broader or longer delay, just replace "5" and "12" the number of seconds you want to range of the delay to be.

Frequently Asked Questions (FAQs)

Will this process work to backup my drafts?

No. Any drafts need to be posted publicly to your TikTok profile to work.

Will this process backup my Collections?

Yes, but only if any of the Collections you want to back up are set to public.

Will this process backup my Favorites?

Yes, but only if your Favorites are set to public. WARNING: It is not recommended to use this tool to download all of your Favorited (bookmarked) TikToks at the same time. If you use TikTok for as long as I have, you may have made many thousands of Favorites. Consider categorizing Favorites into smaller Collections and backup the Collection individually instead.

Will this process backup my Liked TikToks?

Yes, but only if your Liked TikToks are set to public. WARNING: It is not recommended to use this tool to download all of your liked videos at the same time. If you use TikTok for as long as I have, you may have liked tens of thousands (if not hundreds of thousands) of TikToks. Consider categorizing your liked videos into smaller Collections and backup the Collection individually instead.

Will this process backup my Reposts?

Yes, but only if your Reposts are set to public. WARNING: It is not recommended to use this tool to download all of your TikTok Reposts at the same time. If you used TikTok for as long as I have, you may have reposted tens of thousands of TikToks. Consider categorizing your TikTok Reposts into smaller Collections and backup the Collection individually instead.

Extend the TikTok Deadline! Call Your Senators!

A screenshot of a Google search query with dark grey background with white text. The search query reads "is tiktok" with autocomplete suggestions listed below reading "is tiktok getting banned", "is tiktok actually getting banned"

Senator Markey of Massachusetts recently announced on the Senate floor plans to introduce the "Extend the TikTok Deadline Act" which would delay the deadline for the upcoming TikTok ban by 270 days. This legislation would delay the economic harm the ban would inflict on millions of Americans while allowing additional time for our elected officials to have substantive debate on what to do about the ban. Now is the time to act and call our senators to encourage their support of Markey's Extend the TikTok Deadline Act.

Jessica Craven, an adamant political activist and organizer, produced a script (among others) you can read when calling your senators to voice your support of the Extend the TikTok Deadline Act. Below are step-by-step instructions how to do it along with Jessica's script:

What You Can Do

1. Call Your Senators!

Find the phone number for your senators through the Senate's website and call them, or call the US Capitol switchboard at 202-224-3121. Add these phone numbers as contacts in your smartphone so you can call in the future, too.

Every state has two US Senators. Call both of them! If you have trouble getting through to their office in Washington, D.C., go to each senator's senate.gov page and call one of their branch offices local to your state. Those state branch offices are usually easier to get through to a real person.

2. Use The Script

Read the script below when calling each senator. This is taken directly from Jessica Craven's call script document, which has useful scripts on other issues you can call your representatives about as well. Remember: you must use your real name and the zipcode where you live when calling. Since this is an actual call to our real US Senators, we need to demonstrate we are one of their constituents and part of their voting base.

Hi my name is ______ and I’m a constituent from [zip]. I’m calling to ask the Senator to support the newly introduced “Extend the TikTok Deadline Act” from Senator Markey. This bill will delay the banning of TikTok for 270 days, giving Congress time to seek ways to address TikTok’s problems without banning it altogether. This ban will harm millions of Americans who either make their living or get vital information on TikTok. It’s an assault on free speech and got passed without ample debate. Delay it, please! Thanks.

3. Bonus Points!

Other things you can do to push your senators to vote for the Extend the TikTok Deadline Act:

Email your senator and/or send them a letter. You can email your senator through the contact form on their individual senate.gov page through the Contact link (under Message Topic/Issue select "Technology" or "Other").

I adapted Jessica's call script so you can copy/paste the script below into the Message field of your senator's contact form. You can also print it out, add your signature, and mail the letter to your senator!

Remember: replace [Name] with your actual name at the end!

Hello Senator,

I’m writing to ask for your support of the newly introduced “Extend the TikTok Deadline Act” from Senator Markey. This bill will delay the banning of TikTok for 270 days, giving Congress time to seek ways to address TikTok’s problems without banning it altogether. This ban will harm millions of Americans, including your many of your own constituents, who either make their living or get vital information on TikTok. It’s an assault on free speech and got passed without ample debate. Delay it, please!

Thank you and warm regards,

[Name]

Find the contact information for your US House of representative on the house.gov "find your representative" page and put their contact information into your smartphone. This will help when needing to contact your representative about issues in the future (and when the House needs to pass the bill on their end). You can also use third party services like 5 Calls or download the 5 Calls app for iOS or Android to quickly call your representatives in the House and Senate with call scripts about other important issues.

Call Now to Extend the TikTok Ban Deadline

Let's get to work and tell the US Senate to extend the TikTok deadline!

Escaping TikTok's iOS Browser Sandbox (iOS Shortcut)

Update 3 03/19/2023: Over the past few months, TikTok updated their app to include an option to open links in the default browser versus forcing users to stay in the in-app browser. To do this, visit a link in the TikTok app and tap the three dots (…). Choose “default browser” from the list of options and it will launch your phone’s default web browser. As a result, this shortcut now has little practical use. This will be the final update regarding this post.

Update 2 03/19/2022: Added action to restore original functionality. Shortcut link in article has been updated.


Update 1 03/19/2022: The most recent version of iOS (15.4 at the time of this writing) has broken the Shortcut and only extracts the first line of text of the screenshot passed into it. I’m working to update the Shortcut and restore functionality.

I finally got fed up with TikTok’s hostile UX and locking iOS users to using only TikTok’s in-app web browser when visiting creators’ independent websites on their TikTok profiles. I call it hostile behavior because of the difficulty TikTok makes to open a creator’s website in a separate app, be it Safari or 3rd-party app like Chrome, Firefox, or Brave. This is also shady behavior on TikTok by forcing users to stay within the confines of the in-app web browser. If a website does not have appropriate traffic encryption in place, TikTok may be able to capture and siphon any information passing through the in-app browser and tying that browsing history to the user. This means:

  • First and last names typed in for online petitions

  • Email addresses submitted for newsletters

  • Shipping addresses provided for purchases

  • Login information to access other online services

  • Other private information entered through text

TikTok ensures this web traffic goes through only their in-app browser so that it stays within their sandbox of iOS to stockpile this information and more. TikTok pushes a number of tricks on iOS to accomplish this.

An “Ominous” Message

When a user visits a profile weblink that is properly secured so the Clock App cannot eavesdrop on web traffic, TikTok gives a message of caution to the user through a confirmation screen before displaying the page, stating:

“You’re about to open an external website. Be cautious and keep your personal information safe.”

Ironically, TikTok only presents this “warning” when your personal information is safe from prying eyes, even TikTok’s.

Screenshot of TikTok’s confirmation screen before visiting secure websites.


Making the URL Text Inaccessible

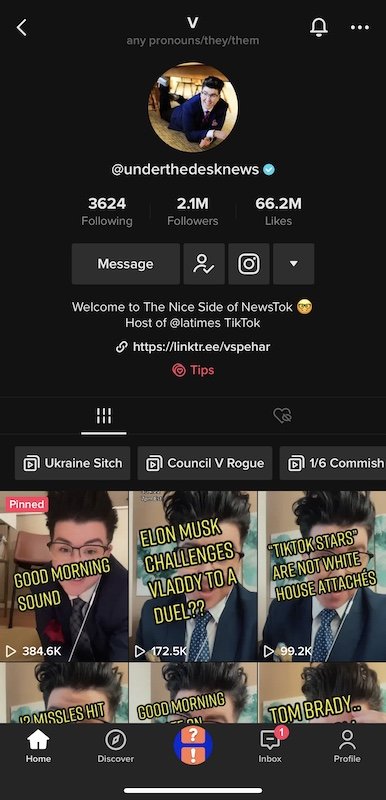
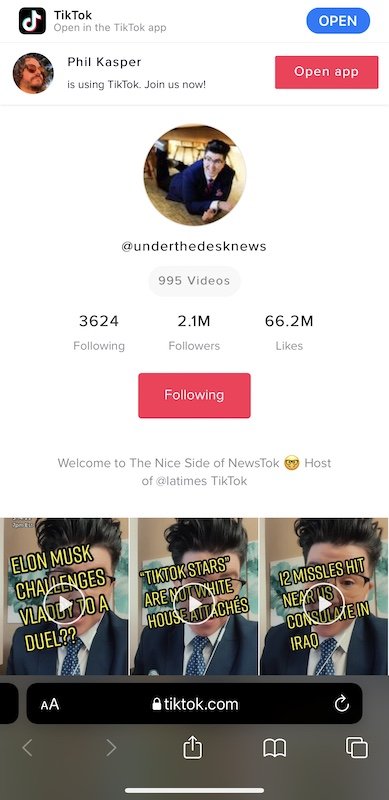
Another method employed by TikTok is making the text of the URL nearly inaccessible to iOS users. When visiting a creator’s profile, we can easily enough copy the creator’s username from the Clock App by tapping on the username itself, but when trying to copy the text of the URL so we can paste it into Safari the task is not so simple. Even when visiting the creator’s profile page through the “Copy Link” feature on their profile page (tapping the three dots in the upper right-hand corner) and pasting this link into Safari, TikTok hides the creator’s website URL in when visiting the profile page in a mobile web view. See below, where @underthedesknews linktr.ee URL is visible on the TikTok app view (left) versus when viewing their same profile page through the mobile web app view in Safari (right):

The Workaround (ios shortcut)

After searching the web for a workaround and finding none, I eventually discovered and developed my own. By taking a screenshot of the TikTok creator’s profile page, I could use the Live Text OCR (object character recognition) feature integrated into iOS (versions 13 and up) to copy the URL and paste it into Safari. However, the process was very cumbersome switching between apps and copying/pasting over and over, and whenever something gets repetitive it’s best to make a Shortcut.

After more brainstorming and research I was able to build off the work of iOS Shortcuts wizard Matthew Cassinelli by taking his “Extract text from photo” Shortcut and modifying it. The Shortcut takes any photo containing text (in this case, a screenshot of the TikTok creator’s profile with their URL), and scrapes out any text in the photo. From the lines of text the Shortcut scraped, we select the one that contains the website link. That line of text containing the URL to the “Get URLs from” operator, which keeps only the text making up the URL. The Shortcut finally opens the URL in Safari.

Shortcut demo

Play the video from my tweet below to see a demo of the Shortcut in action.

Caveats

The Shortcut can be run through the Share Sheet or separately from within the Shortcuts app. I prefer to run it immediately after I take a screenshot through the Share Sheet. However, keep in mind that each time a screenshot is taken the screenshot will end up in the Camera Roll, so don’t forget to clear them out from time to time if you don’t want screenshots clogging it up.

Remember: this Shortcut can only work with the text it is able to detect and “see” in the photo. That means if a URL is too long that it goes off the screen and the link trails off with ellipses (…), then the URL may not render properly and the user may see receive a 404 error when trying to visit the website.

I’ll update the link to the Shortcut above as I find better ways to improve the process of opening links from the TikTok app into Safari. If you’re as irked by TikTok’s web browser sandboxing as I am and you have any suggestions or alternatives to my method, let me know on TikTok, Instagram, Twitter, or in the comments below

Make a Linktree Or Beacons Page with Squarespace

Are you looking for a way to funnel users to your newest content, latest product, or new project? Do you need simple but adaptive landing page to drive web traffic from your presence on social media sites like TikTok, Instagram, LinkedIn, or Facebook? Don't want to deal with the hassle of updating your links on each social media page every time you have a new resource to share or campaign to promote? Having a single, one-stop web page where visitors can land to find everything they may need know about you can be handy to use across social media websites.

Businesses, influencers, entrepreneurs, activists, hobbyists and other individuals may use a service like Linktree or Beacons where they can dump a list of links onto one page and then just share their Linktree or Beacons profile. Even though there's a free tier for each of these services, you will need to subscribe to one of their paid tiers to have additional features such as more robust customization, additional pages, or access to in-depth analytics on how your links are performing and where your visitors are going.

If you already pay for hosting of your own website - like I do through Squarespace - why pay more money for something when you can quickly set up through the WYSIWYG editor for no additional monthly fee? By the end of this article, you'll have an adaptive web page with the same functionality of a Linktree page that will not only come in at no additional cost, but you'll also have access to all the analytics for the traffic you drive as well!

Follow the steps below to build your own Linktree clone. Please note: I am using Squarespace 7.0 or higher with the Bedford family of templates for these steps.

Making the Page

1) Log in to your Squarespace dashboard and click the "Pages" section.

We’ll only be working in the Pages section.

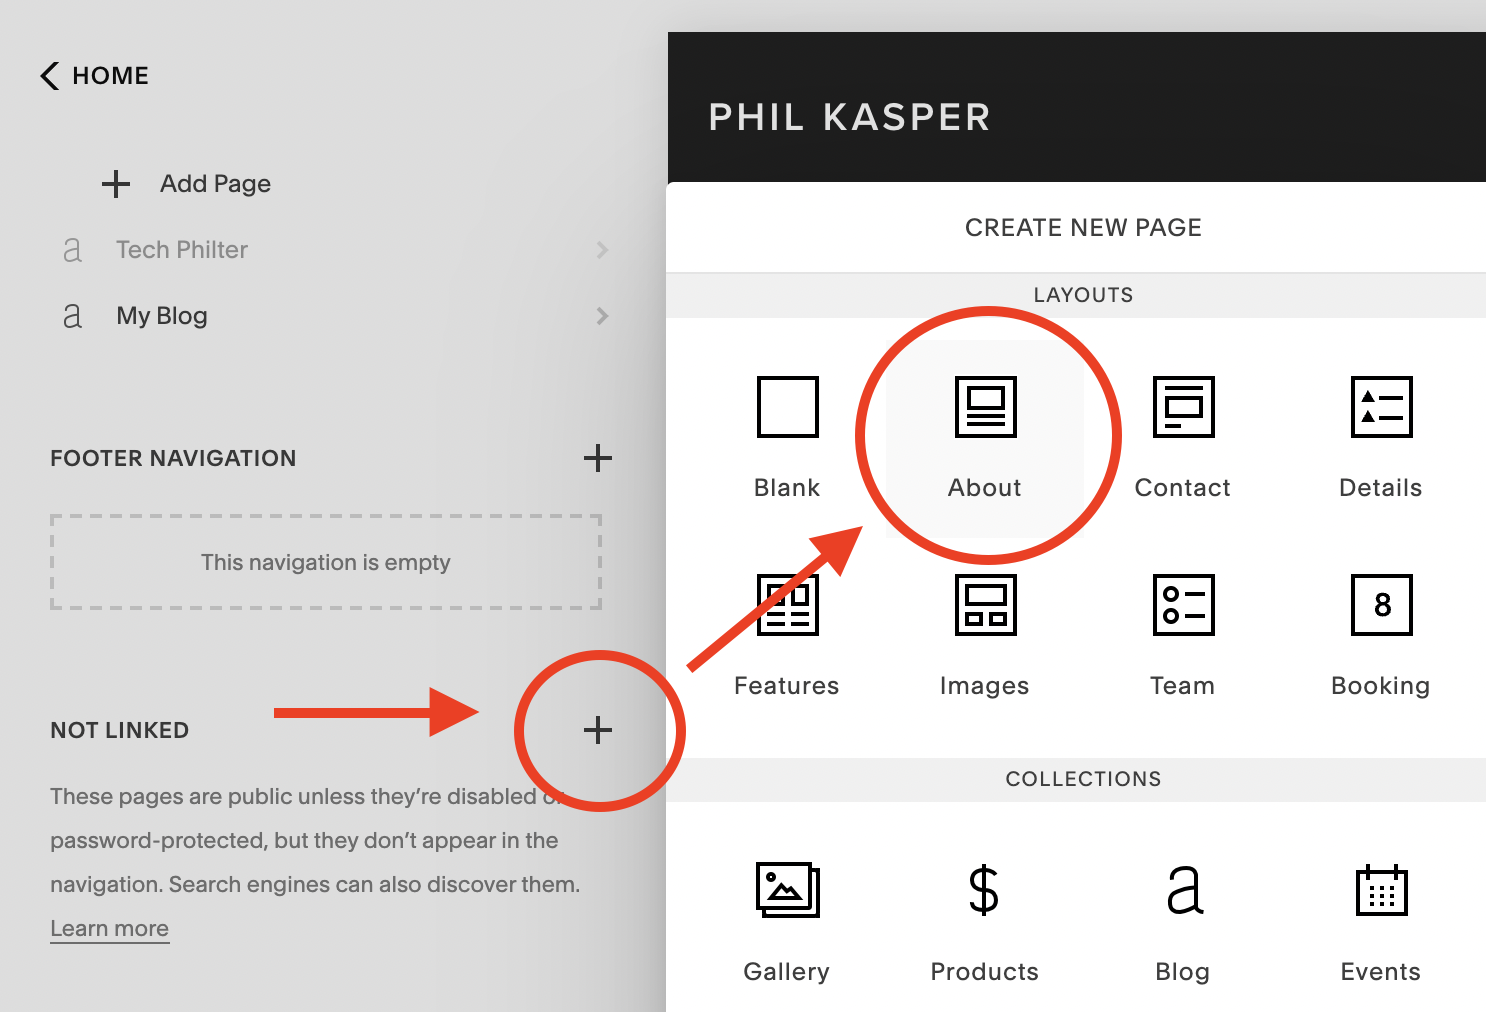
2) On the left side, scroll down to the "Not Linked" section and click the plus sign to add a new unlinked web page

3) Under the Layout section, click "About" and then select the "Vertical" option. This will start out with a simple centered layout that gives an image block, a text block, social media block, and some spacers for visual placement. You can start with just a blank template page and build you own if you wish, but I found that using the Vertical About layout template was quickest for me to get a Linktree clone up and running.

Click the plus sign “+” then the “About” layout option for quick setup.

Choose the “Vertical” option - it will show up best for mobile users after setup.

4) Name the new page on the left side panel to something unique/descriptive so you'll know what the page is for (I used "philslinks" for this example).

Give your new page a name.

5) Hover you mouse over the page on the left side and click the settings cog. On the Page Settings screen that pops up, give your new webpage a short, memorable but unique URL slug or just leave it as the default of whatever you named your page in Step 4. Click "Close" for the Page Settings menu

We’ll need to adjust a setting for the page.

Change the URL slug if you wish and click “Close”

6) Now's the time to build out your web page! Hover your mouse over the right pane and click the "Edit" button to enter into the Page Editor.

Click “Edit” to get started building your own Linktree

7) Here you can start customizing your page to your liking. I have the basic areas outlined in the template below. I recommend leaving the default spacers and uploading a custom image (your profile picture, your business logo, etc.) for the Image Block.

Layout described in Step 7.

8) After uploading your custom image, I suggest going into the settings for the Image Block and turning off the caption in the Content tab and changing the shape from Original to Shape (default is a circle) in the Design tab. You can also play around with animations if you wish in the Design tab as well, but leaving everything else as the default is fine.

9) Scrolling down you will see a default text block sandwiched between two Spacer Blocks centered on the page. I suggest deleting these, moving the Social Media block to be just below your custom image, and adding a Text Block and however many Button Blocks you wish to use for links.

Delete these three blocks: the top Spacer Block, the Text Block, and the bottom Spacer Block.

Move the Social Block to be below your Image Block, add a Text Block and Button Blocks

10) The buttons can be edited to display custom text and a custom link that, when clicked, will take the visitor to the specified URL.

Customize your Button Blocks

11) When done editing your buttons and getting your website the way you want, click "Save" to exit out the Page Editor and you're done!

That’s it!

Great job! You've just set up your own personal Linktree. All that's needed to do now is copy your new page's URL and paste it into your social media profiles. Whenever you want to add a new link in the future, you will only need to add a new button in the Page Editor from the Squarespace dashboard on a computer or through the Squarespace app of your iOS or Android device.

There's much more you can do to customize your page to make it look flashier, but that involves advanced topics like modifying the CSS of your website among other things that are beyond the scope of this tutorial. That I'll leave as an exercise for the reader. For now, farewell and happy linking!

Podcast Gear

IMG_2737.jpeg

In-Person Interviews/Recordings

TASCAM DR-40 4-Track Portable Digital Recorder - My budget all-in-one device for in-person recording if time/space doesn’t allow for my iPhone-/iPad-based setup (explained below). To check audio levels I use whichever headphones I may have on my person at the time. I want to upgrade to the Zoom H6 Six-Track Portable Recorder with double the number of inputs and individual dials to control volume on each input, but it is over twice the price of the DR-40. Pro tip: regardless of the digital recorder model you go with, always put new, charged batteries into your digital recorder before every recording session. It will save headache and embarrassment in the future.

Eneloop 2100-Cycle Rechargeable Batteries - My preferred brand of rechargeable batteries to go into my DR-40 and other battery-operated equipment. High recharge count and can hold up to 70% of their charge for 10 years, these are a solid choice. Depending on how much you tend to use and cycle them, be sure to keep plenty of spares available.

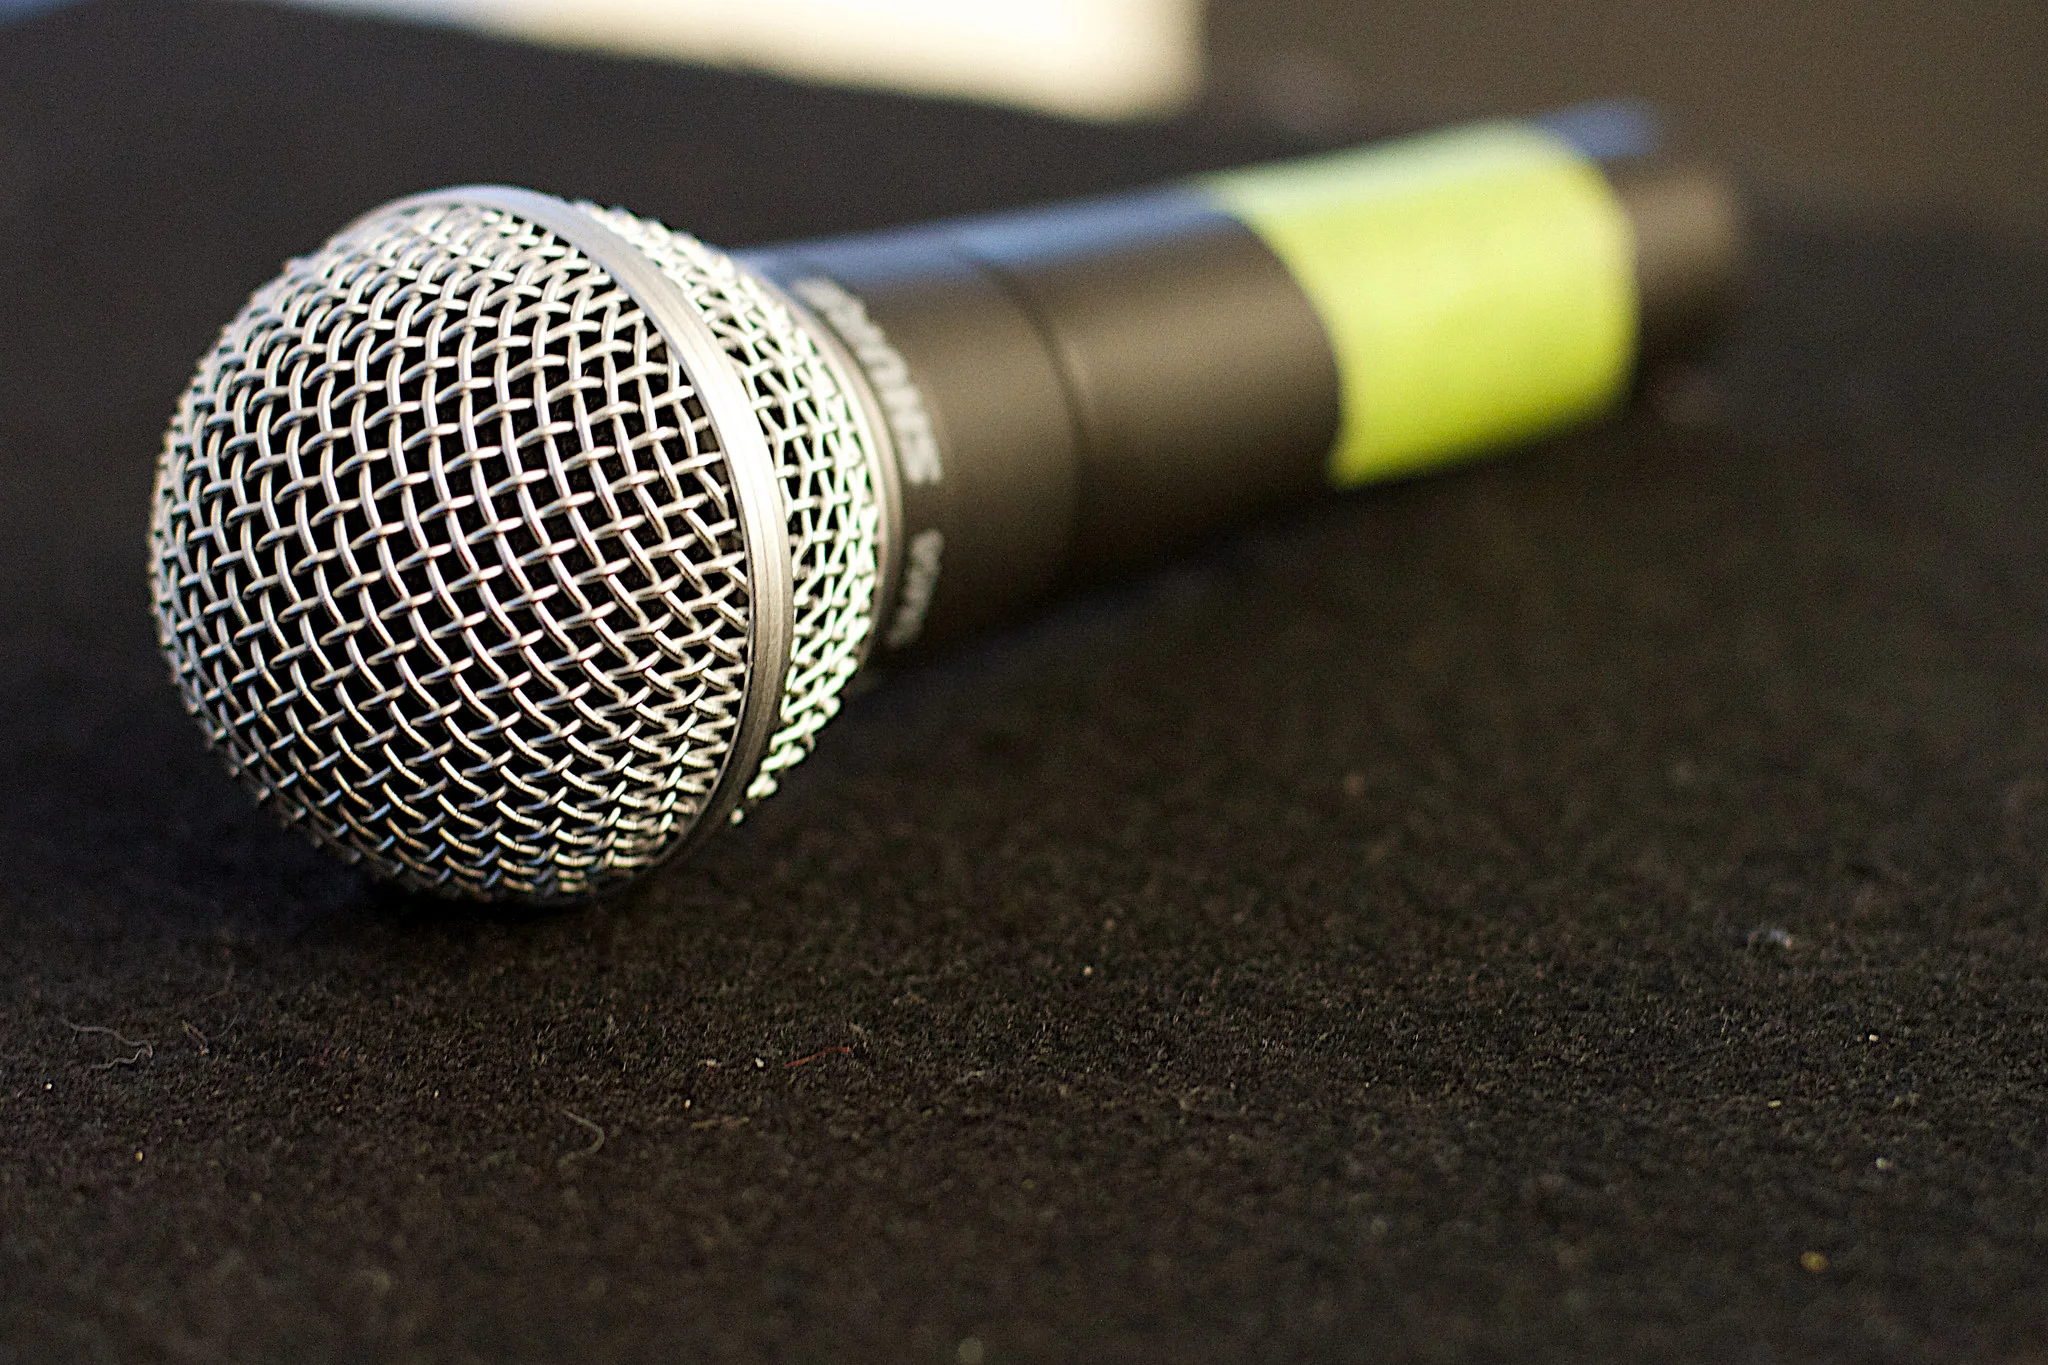
Shure SM58-LC Cardioid Dynamic Vocal Microphone (no cable) - the tried-and-true standard stage mic used by professionals and amateurs alike. Inexpensive and heavy duty, these microphones can be thrown around, perhaps even driven over and continue to work. They make the perfect microphone for recording on location or in a personal space. While other podcasters may hold their microphones, I like to keep mine on a stand with a pop-filter to keep my hands free for referencing notes or other tasks while recording (see Virtual/Home Recording section), but depending on the environment it may be best for you and your guests to hold them.

XLR 3-Pin Microphone Cable (6ft) - For connecting the Shure SM58 to the TASCAM DR-40. Invest in your cables, because they can and will be the common factor in any potential audio issues, and always have spares on hand.

Foam Mic Cover Handheld Windscreen - The next best thing to having a full pop-filter for your microphone. Windscreens will help reduce the pops, clicks, and other mouth-noise that come from recording vocal audio in addition to other factors like environmental wind.

Virtual/Home Recording

Focusrite Scarlett 2i2 Audio Interface - this is my go-to audio interface for in-house audio recording work. Whether I’m connecting it to my laptop or to my iPad/iPhone via an Apple Lightning-to-USB3 Camera Adapter, I use this interface for remote podcasts through Discord, Zoom, and Skype or for solo work such as audiobook narration or recording intros.

Adjustable Microphone Stand with Weighted Base - I use this with my Shure SM58 on my desk so I can go hands-free if needed for referencing notes or mixing during a recording session.

Dynamic Microphone Pop Filter and Shock Mount - A shock mount and pop filter are essential for any microphone fixed to a stand. The shock mount guards against unintentional vibrations through movement on the desk (resting of hands, setting down a drink, sliding the stand…) and the pop filter protects against mouth noise that can be offensive or distracting to the ears.

Shure MV88 Portable iOS Lightning Digital Stereo Condenser Microphone for iPhone/iPad - unmatched audio quality for the size and portability. Great for grabbing quick on-the-go recordings either solo or impromptu interviews. The device fits in your hand and comes with a handy carrying case. Can toss into a bag for travel in case you need to quickly attach to your iPhone for a field audio recording. This has saved me on more than one occasion to grab a last-minute intro alteration or retake.

For Both:

Audio-Technica ATH-40x Professional Studio Monitor Headphones - I use these to monitor audio levels during recording and for post production editing of podcasts. They fit well over the ear for minor noise isolation and are comfortable for long sessions.

Ferrite Recording Studio (iOS/iPadOS) - The app I’ve been using for years to help polish and publish my podcasts. It is designed to improve audio quality of podcasts and increase the efficiency at which you edit them. While there is a free version, $29.99 for the pro features is worth it in terms of the automation and time savings that would otherwise be spent in additional post-production hours.

REAPER (PC/Mac/Linux)- The best bang-for-your-buck general purpose digital audio workspace available on all the main computing platforms. The capacity rivals that of pro-level tools such as Adobe Audition or Pro Tools but for a fraction of the price - $60 for an individual license. Many of the features are designed for mastering of music audio tracks, and there is a learning curve. However the interface customization, built-in plugins, and ability to automate time-consuming post-production tasks make this more than worth price tag.

Why Everyone Should Have a Website

IMG_0444.PNG

I’ve had this idea kicking around in my head for a while, and the more I think about it, the more it makes sense: every person should have a website. Not just every company, organization, company, entrepreneur, politician, athlete, or superstar: Every. Person.

Why should you, and everyone else for that matter, have a website? Read on to find out.

Stake Your Claim

It doesn’t matter whether you’re wanting to sell a product or service, building your own personal brand, or just want a place to write a short bio about yourself. In the ever-growing realm of the Internet, it’s best to stake your claim to a piece of real estate on it. The way to do that is to have your own website. From your own website, you can then branch out and link to every other instance of your online presence (Facebook, Instagram, Twitter, Pinterest, Tumblr, etc.) where others can find you.

Take Control & Independence

With a personal website, a person can control their story and how they want to tell it. This removes the opportunity for someone else to tell that person’s story instead, which will eventually happen. Before I get too far into this: do not think that only having a Facebook page will work. It may be easy to get one and maintain, but that is not a website. A person fully control a Facebook page and who may be able to see it if the page is updated. Facebook’s algorithms take care of that - and charges if a person wants to “boost” their post in order to reach more people. This is basically just living in an apartment rent-free on Facebook’s lot, but Facebook has the control over who goes into the complex and who can go up to any person’s particular floor or room. If someone wants prime real estate, that’s out on the Internet with a personal website. With a personal website, both can be had - a Facebook page to help build community and a website where the person can put anything else. The key concept here is having independence so a person is not tied down to one platform.

I want to hit more on the control aspect: someone with their own website can control how public or private they want to be. I play on the more public side with my website, linking just about any social network account I have at the bottom of my page, and taking blog posts and pictures about as personal as I want. However, people can also have a more private view with their websites by putting as little personal information or thoughts as they wish. Please do not confuse my insistence on people owning their own website with people also needing to constantly market their website or freely share their personal lives - I’m not advocating for that. I’m advocating that just like people need to have a place to physically live in the real world, they also need a place to live on the Internet.

Building is Easy & Cheap to Start

It has not been easier to make your own website. Unless you have absolutely no access to the Internet (in which case, how are you reading this post?) there are few reasons to not have a website. There are plenty of services and tools available online that let you build and maintain your own website with no little or no experience. Hosting services are available for free - like Wordpress, Wix, or About.me - or very little cost depending on the types of features or capabilities you want. No website design or previous coding experience is required to build your site, either. Some services, like Squarespace or Wix, provide simple and easy to use templates that you can choose from to get your website up and running quickly. These services also use a drag-and-drop “what you see is what you get” (WYSIWYG) interface, where you can further customize your site. The tools will only get better from here.

What Are You Waiting For?

Are you still contemplating on starting a website? Why? Judgement from others? Insecurities in your technical ability to design and build a website or afraid you may not be creative (or interesting) enough to fill that site with content? Who cares! Just go do and stake your claim. You can work out the rest with time.

Still have questions or need some motivation? Feel free to post them in the comments down below or send me a DM or reply on any of the social media sites linked at the bottom of this page and I’ll get back to you as soon as I can.

Questions To Consider When Starting A Podcast

Photo by Alan Levine

Photo by Alan Levine

If you’re thinking about starting a podcast there are a few things you may want to consider before jumping right in: How much time and money are you willing to invest? Will your podcast only have one host (usually yourself), co-hosts, or a round table/group discussion format? Are you editing the podcast yourself? What service will be hosting your podcast’s audio files? Do not let these questions discourage you. These are questions I had to ask myself when helping my pastor start the MURP podcast, and the answers to these questions will affect the approach in making your own podcast. Here I’ll help break down what you may want to consider in preparing to go on your own podcasting journey.

How Much Money (And Time) Are You Willing to Invest?

Anyone can start a podcast and at any price point, from free to thousands of dollars. One of the first questions you should consider before starting is: how much do you want to budget for starting and maintaining your podcast? Some things to consider that will cost money are equipment costs (like a microphone to record your voice, a computer, etc.), the cost of hosting a website and the audio files for your podcast, and the cost of audio editing software.

You can start a podcast at very little cost upfront. In fact, if you want to go for the least amount of money possible, you can start a podcast for free using a service like Anchor. With only your smartphone you can record, edit, and publish your podcast all through Anchor at no cost. However, the trade off will be sacrificing quality for saving money. Your podcast may not sound that great using just your smartphone’s microphone and the limited editing capabilities of Anchor’s built-in editor. You may also be giving up creative equity to Anchor since Anchor provides its services to users for free, meaning Anchor itself needs to generate revenue some other way in order to pay for all that free hosting. This may include putting ads before or within your podcast that you may not want. I will revisit tight/small budget podcast options in another blog post, but for now I’m going to assume you have some amount of money to use towards your podcast endeavor.

Solo Podcast

If your podcast will involve only you talking into a microphone, a simple cardioid microphone like Audio-Technica’s ATR2100 USB Mic or one of the more popular Blue Yeti USB Microphones may be the best fit for your format. When I started out my podcasting journey I used the Blue Snowball which was around $50-$60 at the time before graduating to the current setup that I have today.

Two Or More

Recording multiple people in the same room for a podcast will require more hardware, and not only just more microphones. Keep in mind that you will need a the appropriate hardware for each person you want to record, such as a microphone, microphone stand, pop-filter, and cabling (like XLR cables). Recording two or more people on a computer will require something called an audio interface that can translate the analog audio signals from your microphones into digital audio signals for the computer to process. There are many options to choose with an audio interface, and the price goes up with the number of XLR (microphone) connections you want to use for the number of speakers you plan to have. I decided on the Scarlett 2i2 by Focusrite when I started to record the Skeleton Barcode podcast years ago. It supports up to two XLR inputs with the ability to control the gain (basically volume) of each microphone. I still use the Scarlett 2i2 to this day, although I do have my eye on a more robust interface that supports more microphone inputs - the Tascam US-4x4. For microphones I decided on two Audio-Technica AT2020s to provide a richer sound. I also got an adjustable microphone stand and a pop filter for each.

This entire initial setup (audio interface, microphones, stands, pop filters, cables) costs about $450 after taxes, and that was only for a two-person podcast! Don’t let this be sticker price shock for you. Keep in mind: this equipment is an investment. Even though the initial cost may seem steep, you can see years of use out of this equipment with appropriate care.

Speaker & Audience Format

My most recent challenge in recording audio is for Messiah’s Upper Room Podcast, which I’ve been working on for about a year at the time of this posting. I needed to find a way to capture audio of a main speaker a classroom of about 100 attendees. After some research I chose the Tascam DR-40 Digital Recorder since it has two condenser microphones on the top for picking up comments and questions from the large class. It also has two XLR connections at the bottom so I can connect directly to the pastor’s wireless microphone that he uses with the PA system. It’s battery operated, so it is a portable all-in-one recording device, and uses an SD card so we can easily transfer the recordings to a computer for editing. This choice was due to budgetary restrictions, but if I am able to upgrade in the future I will want to go with the Zoom H6 Six-Track Portable Recorder for more robust recording capabilities where I can record up to 6 different people in high quality and adjust/mix their individual levels on the device itself.

In this environment, you may want to consider using multiple room mics strategically placed throughout the room to pick up comments, or have dedicated wireless microphones and runners that can hand the microphone to a person in the audience that wants to ask the question, but these scenarios can quickly rack up equipment costs, especially for wireless systems. I stepped back and examined what may be the best fit for our church’s current scenario and the goals of what we want to accomplish. I also weighed what audio source is the most important, which would definitely be the pastor’s, so ensuring he has a direct line into the recorder was an absolute requirement.

Editing Software

If you’re planning to record and edit the podcast all yourself, you will want to consider the not only the investment of money, but also the investment in time to learn the audio editing software (if you have no prior experience recording/editing podcasts) and the time to actually edit and produce the podcast. Audacity is a popular free, open-source software solution with a large community of help and support on how to start using it for various audio editing needs. There is also no shortage of online tutorial videos you can use to help teach the basics of editing audio and improving the overall sound of your recordings to make them sound better before publishing your podcast episode online. I recommend you begin editing with Audacity, especially if making a podcast is just a hobby at this time.

My audio editor of choice is Reaper which has a free trial and, if you like the software enough, a non-commercial license is at the inexpensive, one-time price of $60. Reaper is more than an audio editor, and is a full-featured Digital Audio Workstation (DAW) that provides advanced functionality like automated actions, audio manipulation features like effects chains, and plugin support for third-party audio tools at a fraction of the price as other professional-grade DAWs like Pro Tools, Logic Pro X, or the monthly cost of Adobe Audition. Any of these tools will come with their own learning curve, but if you maintain the mindset that this purchase is an investment in your podcasting future the early difficulties of learning new software will outweigh the future benefits and sound of your podcasts for years to come.

Cost of Hosting

You will also want to consider the costs for hosting your podcast and website including the registration fees for a custom domain name (like philkasper.net) which for a .com or .net domain can range between $10-$16/yr. You will also want to consider what service to use that will host your website and where you can guide people towards. One inexpensive option, and also the most popular, is Wordpress. The MURP Podcast uses Wordpress to host the website content for $8/mo. However, this does not include the cost of hosting the audio files for MURP episodes, so I needed to use a separate service, in this case SimpleCast to host my audio files. There are other podcast hosting services such as libsyn that will host only podcast files. Some hosting services offer hosting for both a website and podcasts like Squarespace, blubrry, and SimpleCast.

Choosing which hosting combination will be up to you, but I suggest you expect to pay at least $20 per month to host both a website and podcast files on the Internet when starting out.

Choosing a Website/Podcast Host

You can start a podcast without a website, but I do not recommend it. I suggest that people to register their own custom domain and choose a hosting platform to have their own website in order to stake a claim on a piece of land known as the Internet, regardless of whether they plan to start a podcast. If anything, they will be able to have their own central hub that they control to present themselves to others. Having just a Facebook page or Medium account where you blog regularly can potentially corner a person as they rely on that one single service to stay around, unchanged, in perpetuity. The platform itself can change the rules on how content is displayed or monetized at any time. People who may not want to be bothered with the hassle or expense of owning and maintaining their website, I recommend they create an about.me page at the very least.

When starting a podcast, you will need a website and a place online where you can host your podcast’s audio files and a central area on the Internet where you may point people towards in order to learn more about your podcast. As mentioned earlier, some services provide hosting of your website while other services provide hosting and distribution for your podcast’s audio files. Still some others provide both. What will work best for you will depend on cost and preference. Below I outline a few different solution combinations.

All-In-One: Podcast & Website Hosting

Using an all-in-one solution can bring ease and simplicity into the podcasting equation, especially if you’re doing everything for a podcast yourself. Here are a few different solutions you may want to consider that provide both hosting of your website and your podcast files:

  • Squarespace - This is my go-to website host of choice because of its easy to use, WYSIWYG (What You See Is What You Get) interface that can be used for beginners because you can simple start with a design template and drag-and-drop website elements to tweak the design how you like. Professionals web designers don’t have to feel limited as you can include custom coding into a Squarespace site as well. Squarespace also has a healthy amount of helpful documentation to help show you how to use Squarespace features, how to set up a podcast on your website, and message boards in case additional support is needed. The website you’re reading this on is a Squarespace site, and I’m planning to launch my next personal podcast on this platform. Even though I don’t use it for podcasting (yet), I do recommend Squarespace to at least host your website because it’s just so easy to use. If you’re interested in looking into Squarespace, they provide a two-week free trial, afterward tiered hosting plans start at $144/yr or $16/mo. All hosting plans include unlimited data storage and bandwidth, however, which is an enticing option for someone looking for a single-host solution.
  • Blubrry - originally made popular because of its powerful plugin for Wordpress sites, Blubrry now provides hosting of podcasts and will also host your own Wordpress-based site as an added option. Unfortunately I can’t speak much to how the service performs as I have not personally used them, but I do know that using just a basic podcast hosting plan & a managed Wordpress site with a custom domain name will start about $32/month.
  • Simplecast - I only learned about this website recently through an article I read during the 2018 holiday season on TechCrunch and I’m still testing out. I only use it for hosting the Messiah’s Upper Room Podcast’s audio files, but Simplecast offers an option to include a simple blog-style website so you can also have a front-facing site to direct subscribers to when you post new episodes. The drawback here is that administration of the website appears limited in simple editing of a post’s content and is only limited to one web page meaning you may not be able to add supplemental pages that may contain more information on yourself or your podcast or make a page for users to interact with (such as creating a contact form or users the option to sign up for a newsletter). I moved to hosting MURP’s files to Simplecast from Amazon’s AWS s3 service because I needed better analytics around who is subscribing and listening to the podcast on a weekly basis. I’m still learning their interface and analytics, but for now it appears to provide the information I’m looking for. If you’re looking for a basic website option that’s already included with podcast hosting for a total of about $12/month this may be a solid option to consider if you’re on a budget.

Website Hosts

Keeping your website host different from you’re the service hosting your podcast files can be useful. For example, you can easily switch website hosts while keeping the backbone of your podcast distribution network intact, or change your podcast host while keeping your website the same. Here are a few different website hosts you may want to consider:

  • Squarespace - Wait. Didn’t I just talk about Squarespace in the previous section? Yes, but Squarespace just makes it so easy to build a nice looking website from the get that I feel compelled to give them another mention here just for hosting a simple website. Squarespace is more a robust website host that offers standard podcast support rather than a robust podcast host that offers a standard website.
  • Wordpress - This is probably the most popular website hosting and building platform on the Internet. You can actually start building a website at no cost with their Free tier and get familiar with Wordpress’s website building tools, but if you want access to more advanced features or more control over your website, hosting plans start at $60/yearThe free tier will give you 3GB of online storage space to host your website files such as graphics, documents, other content, etc. A breakdown of the differences between each pricing tier can be found Wordpress’s site here. It is possible to use Wordpress’s $60/year for the purposes of a podcast website. I use Wordpress to do just that for Messiah’s Upper Room Podcast, but I use Simplecast to host and distribute my podcast files, which brings the total hosting cost to $184/year for hosting the website and podcast after accounting for the $12 monthly cost for Simplecast.
  • Wix - Wix is another name I’ve heard when talking with others wanting to build a website or start a podcast. I haven’t used the service myself, but from my research online they look like a direct competitor to Squarespace. Wix provides a WYSIWYG editor but allows supports custom coding for websites on their platform, so you’re not limited to only using Wix pre-defined templates. You can find different pricing plans on here on the Wix website. They have a free tier where you can try out the tools and host a website, but if you want a custom domain name and other features/benefits, you’ll need to buy into one of the premium plans.

Podcast Hosting

Now that you know about the different website hosting services you can use to host and build your podcast’s website, it’s time to look into a podcast host. You can’t have a podcast without somewhere for your podcast files to live. You need a way for people who find your podcast to easily subscribe and download the episodes you regularly release. When doing your own research on podcast hosting services, you may want to consider the hosting service’s method of uploading podcasts.

Some service plans allow for only a certain amount of data to be uploaded per month, like 250MB per month, which is plenty for someone to release a one-hour podcast each week. Some plans allow “overage data” which is a set monthly allowance in case you accidentally surpass your monthly because one of your episodes ran longer than expected and will bump you over your data limit. Usually this overage data can be 50-100MB each month and you won’t incur a fee for going over. However, any more than the overage limit and you’ll need to pay for extra capacity if you plan to continue producing more podcast content. Still some service plans consider the total audio length for episodes uploaded each month, such as 5 hours of audio per month, meaning each month you could upload five one-hour podcasts, 10 30-minute podcasts, etc. As long as you don’t go over the allotted time limit you may not incur additional fees. Below I highlight just a few services that offer hosting for podcast files:

  • Libsyn - This is a service I used to distribute The Skeleton Barcode and still consider it a valid option when thinking about launching a new podcast. They’re one of the older, more established podcast hosting platforms which can give assurance to users that this isn’t a no-name hosting company. Their tiered service plans are based on how much audio data you upload per month. So, if your average podcast length is around 30-minutes encoded at 128kbps, that will come out to a file size around of almost 29MB. If you do one episode a week that turns out to be about 116MB per month, which Libsyn’s $15 Classic plan will more than cover - this can also give you some extra headroom for you to go for longer or more podcast episodes if needed.

    Libsyn also provides different levels of statistics. Statistics are handy to gain insight on your audience because you can see what episodes are more popular in terms of number of downloads an episode receives over time, what the most popular platforms are that your podcast is listened to on, and geographically where podcast downloads are coming from. When I used them for The Skeleton Barcode, I found that basic statistics were enough for me.

  • Blubrry - Blubrry is a podcast host first and a website host second. Couple that with the fact Blubrry provides pricing that includes pricing hosting of only podcast files separate from hosting of a website, and you have an established podcast hosting platform that’s just as popular in the podcasting world as Wordpress is in the website building world.
  • Simplecast - Dead. Simple. Podcast. Hosting. I’ve been using this service for a few weeks now and I enjoy the simple approach that’s true to their namesake. There’s only one plan that’s $12/month, their website interface is intuitive to use, and there are plenty of helpful articles on their support page if you get stuck somewhere and need a little help. They also have live chat in case you still need extra assistance. Statistics are included and their podcast metric-gathering is IAB (Interactive Advertising Bureau) 2.0 compliant, meaning if you ever want to help monetize your podcast through advertisements, your podcast statistics can provide useful and appropriate data to potential companies that want to advertise on your platform.

    I mentioned Simplecast previously in the all-in-one section, but, like with Blubrry, consider Simplecast as a podcast host with limited website hosting capabilities. What I didn’t mention earlier was that Simplecast’s hosting plan allows for unlimited storage for podcast episodes. The only limitation I see that’s put on podcast episodes is that the audio quality is limited to 128kbps, meaning if you upload an audio file over that rate, Simplecast will transcode it to be at the limited rate. This rate is more than enough for a spoken-word podcasts.

Life After Podcast

Unfortunately all good things must come to an end, including podcasts. Something to consider if your podcast is ever to retire, will you continue hosting the audio files for people to still download and listen to even after you’ve stopped producing new episodes? Even though you may not continue to make new content for your retired podcast, those files will still need a place to live, whether it’s on one of the hosts above or if you move it to file server of your own. Either way there will be continue hosting costs well after your podcast ends that you may want to consider. If you don’t want to continue to pay for hosting, access to these files may go away, so you may want to make sure you have a backup before completely ending your podcast’s existence.

Final Notes

I’ve only touched on a few things to consider and the many different ways you can start a podcast. If you have any questions I’ll be happy to help where I can. Leave a comment down below or send me a message on Twitter, Instagram, or Facebook.

There are so many ways to get started on a podcast, but don’t let that keep you from starting. If all you have at the time to start a podcast is just the microphone on your smartphone, then start there and move your way up. Don’t let these suggestions I outline give you paralysis by analysis.

Just go do.

On Wireless Headphones

Photo by Aaron Yoo, CC BY-ND 2.0

Photo by Aaron Yoo, CC BY-ND 2.0

Earlier this week the batteries on my bluetooth headphones died and a funny thing happened: it reminded me why I prefer bluetooth headphones over wired headphones. Many people may think the batteries running out on headphones would be a large red mark in the "con" column when comparing them to their wired brethren, but I count batteries as a large "pro." Why? Because it had been five days since I charged my headphones - they lasted so long that I forgot.

The Freedom of Wireless

I cannot see myself going back to wired headphones for my smartphone ever again. The convenience and freedom given from bluetooth just cannot be matched with wired headphones. Bluetooth allows for maximum connection distance of approximately 30 feet without wires. That's a 30-foot radius of freedom where I can leave my phone in one place and walk around the apartment, my work desk, or anywhere else for that matter without worrying about whether my phone will get pulled off whatever surface I set it on. I don't need to worry about headphone wires getting tangled in my pocket when they're not in use because I can wear my bluetooth headset around the base of my neck all day. With automatic pairing, all I need to do is turn my bluetooth headphones on and they immediately connect to my phone. I don't need to dig my phone out of my pocket to plug in my headphones when I want to listen to something.

Just minutes after pulling out my backup pair of headphones which I keep for listening in on virtual meetings on my work laptop, I began to resent the restrictions the two or three feet of cordage I needed to manage and be conscious of at all time. Attempting to put my phone anywhere with the cable attached was an awkward ordeal, and the cables hanging down from my ears to my phone like some audio umbilical cord just made me more distracted. My forearm and hands constantly bumped the cabling and, when I needed to move around, I need to be wary of the armrests for my chair or the corners of my desk for fear of getting my headphone cable hooked and the earbuds torn off of my head or phone pulled out of my pocket.

The main criticism I hear from people is that getting a set of bluetooth headphones just means remembering to charge yet another device. Sure, much like how knives don't need reloading, wired headphones don't need recharging. However, the sacrifice in mobility and agility isn't enough for me to justify using wired headphones again. Plus, unless I'm listening to something nonstop for at least 6 hours, recharging my headphones is not enough of an inconvenience, if it can even be considered one. I typically go for days without charging my headphones after normal use, and, when I do need to give them some extra juice, a short 10 to 15 minutes on a USB cable will give them enough power to get me through the remainder of any day. With the increasing prevalence of USB-C and wireless Qi charging for smartphones and other devices, it is only a matter of time before charging a wireless headset becomes less of an issue.

My Headphones

I have a pair of LG HBS-750 bluetooth headphones. The kind that look like a tech necklace of sorts. Previously, I owned bluetooth headsets like those from Jabra or Jawbone - the kind that hang off one ear, made you look like cyborg when viewed from one angle, and made you look like some crazy person having a conversation with yourself when viewed from another. I used them so I could listen to podcasts, but after their inevitable malfunctioning from use and wear, I needed to move on to another, more robust model.

I've owned this particular pair from LG for going on two years, and I don't know why I would ever go back to wired headphones when I'm on the go again. This pair is comfortable, light, hardly noticeable after I tuck them underneath the collar of my button-up over-shirt, and always quickly accessible when I want to listen to something. The battery life is fantastic. I use them several hours a day, and even after keeping them on standby because I forgot to turn them off when I'm not using them, I usually go three days or more without needing to put them on a charger. Even when they do need a charge, a quick 10 to 20 minutes on a micro USB cable will give them enough charge for me to finish my day.

The weakest part of them from my experience is their poor call quality. I can listen to phone calls with reasonable clarity, but when attempting to have a conversation through them I get comments 98% from the person on the other end that it's hard to understand me or that I sound far away.

Overall I'm impressed with these headphones. Considering I bought them at around $70 a couple of years ago and they're still operating to this day after daily use, this pair of headphones definitely earned every penny of their worth.

Edge Case

I understand I'm probably an edge case when it comes to headphones and audio. A majority of the audio content I listen to are podcasts or audiobooks, with actual music making up a small portion of my overall listening time. Due to most of my audio experience being spoken word, overall quality is not as much of an important factor to me as an audiophile.

My want for gadgets and other tech keeps me interested in chasing the dragon of the next cool device, and I'm currently on the lookout for my next pair of bluetooth headphones. I think you should be too. With the rising trend of smartphones without a headphone jack, with the iPhone 7/8/X and now the Pixel 2 just to name a few, bluetooth headphones will be gaining in popularity regardless of where your loyalty may lie.